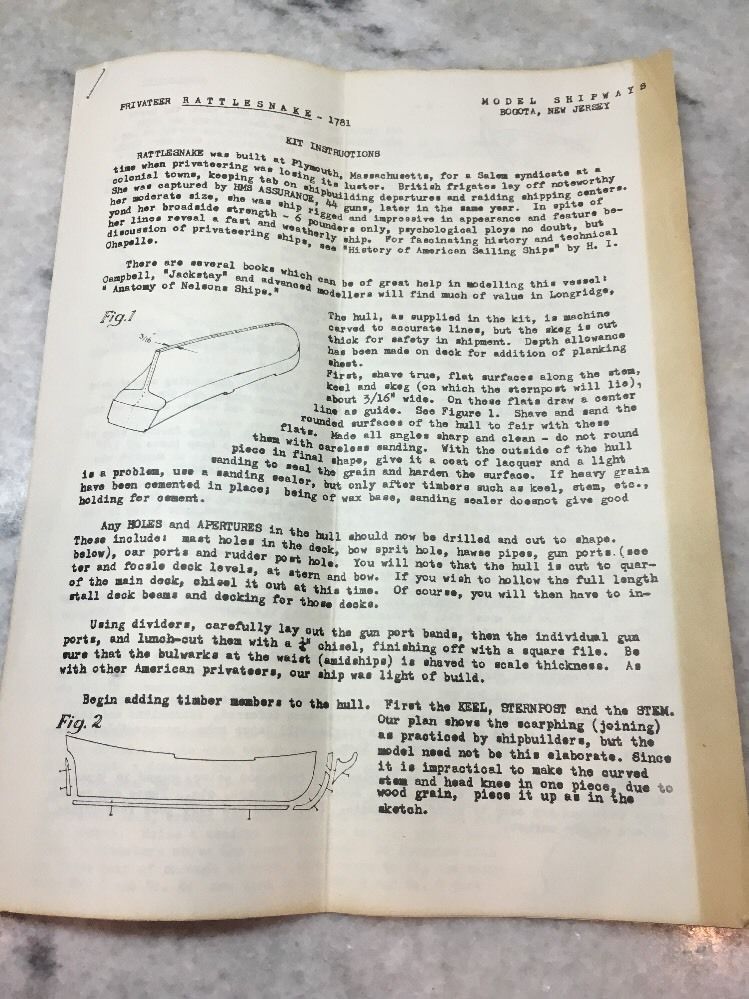
I got this model as a birthday gift from my dear wife in 2007 – I know I’m a lucky guy – my wife encourages me in my hobby. She is the love of my life!!
This thing is huge and will take quite a while to finish. I have been compiling a lot of reference photos from sources on the web. I have added some wiring in the drivers area – the full interior will not be too visible – so I will try and open up as many of the hatches as I can. Here are two pics of the progress thus far (no weathering yet):


3-23-08
I have finished the engine and aft bulkheads and installed them. The transmission is almost finished. I have added some weathering to the interior as well as the engine and transmission. Weathering was done with paint and oil washes as well as the Tamiya weathering sets and chalk sticks that I shaved to produce powder. I will add some pics soon.

3-25-08
The transmission is finished and installed along with the brake drums and exhaust pipes. I had to modify the brake drums to get them to fit because I glued them together wrong – hazards of late night plastic assembly! All is well now though. I plan on modifying the back armor plate to show it open so the transmission and brake assembly can be seen. The Tamiya weathering sets are very cool and help a lot in adding that worn look. I painted the transmission case with Modelmasters aluminum enamel and then gave it a really thin wash with Tamiya flat white. That gave it a nice worn look. And – here are the pics – if you want bigger – just click:

3-31-08
I finished detailing the top and the underside of the tank body. I filled in all of the sinkholes in the tank body as well as the turret. I added some support structure around the transmission and modified the back plate of the tank so it can be shown in the unbolted down position for transmission maintenance. This will allow the transmission and brake area to be visible. The drivers hatch has also been finished and detailed.
5-6-08
This model build has slowed down a lot this past month. My son graduated from college and he and his wife have moved in with us to look for jobs and while she goes to graduate school. – so that took a few weeks. I have since painted the tank hull and running gear Tamiya German Grey then a top coat of Model Master dark green – which is close to the Russian green. I have yet to finish the detail painting of the inside the the top part of the tank hull. I will post pics soon tho – there isn’t much new to see as the dark green is – well it’s dark.
5-8-08
OK – here a some pics, notice that the road wheels have been added. The back plate isn’t finished, I just stuck it on for the photo….

5-15-08
Here are some pics from the 2008 SVSM Kickoff Classic at the Santa Clara Convention Center. It was on display as an unfinished model and wasn’t entered into the contest.


I have been working on the cannon barrel. It’s a two piece plastic part – could have used a turned aluminum barrel here . I found one online at JadarHobby Shop in Poland for $33.00 – a little too steep for me. So I will make do. After gluing the barrel together I stuck a brass tube in it with some blue tack stuff on the end to hold it. Then I chucked the other end in my trusty Craftsman cordless drill. Now I was able to sand the barrel smooth with the dill spinning it at a nice clip. After shooting it with a coat of primer I noticed some seam lines still visible. I applied some Tamiya primer paste to the areas and when that was dry sanded it down again. I repeated this process till I was satisfied with the results. Not aluminum but not expensive either.

5-21-08
I have finished a lot in the turret. I filled the casting marks on the inside with Tamiya primer using a toothpick – that worked well. The interior was painted with Tamiya flat white and weathered using my 3 Tamiya weathering kits. Sounds like I’m an advertising agent for Tamiya – well I’m not. The ammo storage assembly went together well and looks nice in the lower turret half. I finished the canon assembly with Model Master dark green and sprayed it with Model Master semi gloss from a rattle can to simulate an oily finish. That was detailed with silver, gun metal and flat black (Tamiya again). When I get the upper and lower halves completely finished, detailed and weathered I’ll take some photographs and upload them. This model is turning out very nice so far. I also finished assembling the tracks which were literally a snap. This thing is really starting to look like a tank!
5-26-08
Here are some pictures I took today. First up is the interior details of the turret after a little weathering.
Here are some pictures of the tank with the turret assembled but not glued together.
And finally pictures of the underside of the turret looking inside.
5-30-08
I’ve started weathering the tracks. The paint application by airbrush was in the following order:
- Model Master Steel Non Buffing
- Sealer for Metalizer
- Tamiya Gun Metal X-10
- Random misting coat of Tamiya Flat Earth XF-52
- Random misting coat of Tamiya Red Brown XF-64
- Random misting coat of Tamiya Flat Black XF-1
- Random misting coat of Tamiya Orange X-6
- Random misting coat of Tamiya Flat White XF-2
I must say that I’m completely satisfied with the appearance yet. More to be done on the tracks – perhaps they will look better when I weather the road wheel areas and add some dust etc.
I also glued the turret halves together and used Tamiya putty over the seam area and Tamiya liquid surface primer on the seams by the gun mantle.

5-31-08
I painted the tank the proper color of Russian green using Model Master enamel. I made the same mistake I’ve made in the past. I started painting with the assumption that the paint was acrylic. It doesn’t work too well to thin oil base paint with water! When I thinned with paint thinner the results were much better. I finished painting and detailing the drivers hatch and the interior of the tank. I’m now ready to glue the tank body together. I’ve also finished gluing the final bits to the tank so I can give it a final spray with Russian green. I still need to add some extra bits such as the spare tracks, large saw and the tow cables. The spare tracks still need to be painted allso. This model is going to look really impressive when it’s finished. There is still a whole lot ‘o weathering that needs to be done however.
6-3-08
A final coat of Russian green was applied to finish off the just attached bits. For some reason this paint smells oily for about 2 days – I guess that’s oil based paint for ya. When that was dry I shot the whole tank with Tamiya clear flat – now that gave it a nicer more realistic look. The rubber road wheel covers lost their shine. I then shot the exhaust area and road wheel area as well as the tracks with Tamiya smoke. I also painted the tow cables with Tamiya gun metal and glued the tackle ends on. I still haven’t glued the hull together. Maybe I can keep it separate so that the interior can be viewed on occasion. More to come so stay tuned.
6-4-08
Ok – so here are a few pics…
6-11-08
I have now finished and added the spare tracks on the right side and the saw on the left side – then I gave the whole model a coat of Tamiya clear flat from their rattle can. I used the Tamiya weathering set to give the raised portion of the tracks a steel appearance like they had been scarped clean on street surfaces – I followed this with a coat of Tamiya clear flat to protect the effect. Then came an oil pin wash (actually a dot wash in this scale) of white, black, dark brown and dark green. After waiting two days for this to dry I gave it another thin coat of clear flat to seal this then a soft spray of Tamiya desert yellow on the lower surfaces. The turret was then masked off and the white stripe was painted on. I made a mistake here and forgot to leave a gap on the side of the turret for the tank number – so I had this section of a white stripe that I needed to remove. I masked off the rest of the stripe (the good part) and using q-tips and Windex I carefully swabbed the offending area. That got most of it. I then used Tamiya paint thinner to get the rest. The weathered paint in this area looked different than the rest of the turret – so I repeated the oil pin wash there and it was all good. In the process I had knocked off several turret parts which I now replaced – all except for one large stowage bracket on the side of the turret. It was nowhere to be found – where do these pieces go anyway? I replaced this with a piece of bent brass wire. These weathering effects really make the tank look realistic! As soon as I get the decals on I’ll post pictures.
6-12-08
Ok – I’ve put on the decals. There weren’t many and all on the Turret. I first applied a coat of Future then put the decals in really warm water. After I got the decals positioned like I wanted them I used Microscale Set and Sol the get the to snuggle down. After they were dry I found I had some silvering problems in some areas. Repeated applications of Micro-sol didn’t help. The decals were snuggled down nicely – and there was still that persistent silvering in some areas. Ok – out came the Tamiya liquid thin cement. I dabbed it carefully on the offending areas and walla – no silvering. Of course the decals were really dissolved too – but not distorted. When they were dry I shot the turret with a coat of Master Modeler clear flat. I’ll try and get some pics up soon.
6-14-08
Ok – here are some pics – I still have to do some weathering on it but this is pretty close…..
6-17-08
Since this model is for the most part finished – I’m transferring it to the Review section. I still have yet to add some mud in the form of Squadron Green Putty and to depict diesel spills with Future. When I get those done I’ll add some more pictures here.
3-6-09
I’ve added a few pics to show the tarps I added to the back of the tank along with some misc. tools and bolts made up from scrap. Ok – this pic I haven't found yet.


3/26/2013 I've added 20 more pictures of the finished tank. In looking over this article I realized that I hadn't taken too many when it was done – time to rectify that!


Here are some pics I found on the internet – sorry that I can't list the reference…